Chapter 3.1.6 KDE Partition Manager
KDE partition manager creates partitions partitions, deletes partitions, and checks the health of your hard drives and solid state drives.
Warning
Deleting and creating new partitions can result in data loss so please back up your data before removing or creating partitions.
Usage
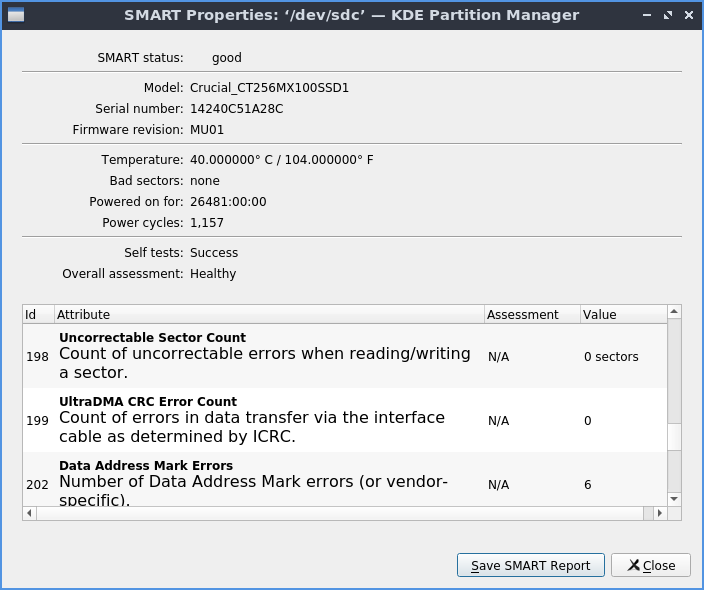
To check the health of your hard drive or solid state drive on the or by right clicking on the device in the side pane . The field SMART status shows the overall health of your drive or if it has detected any problems. The field Model shows the model number of your particular drive. The field Temperature shows the temperature of your drive but it is bad for it to be too hot. The field Bad sectors show how many sectors on your drive are no longer functioning. The field Powered on for shows how long your drive has been powered on. To see how many times your machine has rebooted with the drive look at the Power cycles field. The Self tests field is for if the drive has completed its self tests. The field Overall assessment shows your overall status of the drive.
Below is having a list of the raw values of smart on the drive some of which can be vendor specific or depend on each drive. One important one on spinning discs is to realize if the Reallocated Sectors Count which if nonzero likely means imminent drive failure.
You can see your disk usage for each partition graphically with the bars at the top with the shaded in part showing a bar graph as the percentage full of the partition and you can select each partition by left clicking on that section of the bar graph. The Type column lets you see which filesystem is on the partition. The Mount Point column shows where that partition is mounted. The Mount Point column shows where that partition is mounted. The Partition Label column shows the name of the partition. The Column Size shows the size of the entire system while the Used column shows the amount of space used on the drive. To see what flags a partition has use the Flags column. If you want to add or remove additional columns showing info about partitions right click on the labels of the columns.
On the side pane to the left you can switch between each different drive on the left with the name of each device. Another way to switch which device you are managing partitions on use .
To delete a partition left click on a partition to select it press Delete, , or right click and select . To add a new partition in unallocated space press Control+N or . To view statistical information on a partition select the partition or right click on that partition . To resize or move a partition press Control+R, , or right click on the partition and select . Once you change the size choose the Size field.
On the bottom of the window a list of Pending Operations to be applied to your drives. To undo an unwanted pending operation right click on the operation and select , left click on Undo on the toolbar, or press Control+z. If you want to delete a partition on a hard drive and overwrite the data on that partition or Shift+Delete. However shredding solid state drives is not recommended as it may not fully scrub the data and may marginally wear out your drive.
To change your partitions you will need to apply your changes later press the Apply button or . After pressing Apply a dialog will come up asking you to confirm and check this is what you want to do and then press Apply Pending Operations to apply these changes. To go back from this point press the Cancel button. To undo your your changes to your partitions press Control+Z, the Undo button, or . To clear your operations that have yet to been applied or right click on pending operations and then use the dialog to confirm.
If you have say a new solid state drive that is not formatted you first need to put a partition table on it. A new partition data will get rid of all partitions on the disk which means no data will be visible anymore. Then you will need to create a partition on to store data. To actually create a new partition table press Control + Shift + N, left click on New Partition Table, or . On unallocated space you can right click on the unallocated space press the New button, , or press control+N. A window will popup saying with what type of settings to create the partition with. To change what filesystem you want to create will show in the File system: drop down menu. To change what size of partition you want to create change the Size: field. To create free space before the partition change the Free space before: field. To change free space after the partition change the Free space after field. To actually create the partition press the OK button while to cancel press the Cancel button.
Warning
Creating a new partition table on a disk with data on it will cause the loss of all data on the entire disk not just a partition.
To change a mount point of a drive internally for your machine to have it start mounted access to it always or . This will popup a new window to choose the path where to mount this partition enter it in the Path field. Below there are many Options for how to mount things. To actually cause this to be mounted press the OK button. To cancel mounting this partition press the Cancel button. Once this happens you will get a dialog asking if you really want to do this as it changes the file in /etc/fstab. To really go through with changing this press the Save changes button. To not save these changes press the Cancel button. After you have done this you can right click on this drive and select Mount to mount it immediately. Once saved in /etc/fstab your drive will be saved and mounted at this point every time. However if you want to edit a mount point you will need to unmount the partition first and you can do this from right clicking and selecting Unmount.
To view information of a partition on your drive double click on it or . On the top a bar code on the top shows how full the partition is. To see what kind of file system it is in the File system field. To see a label on your filesystem look at the Label field. To see where that partition is mounted is in the Mount point field. To see information if a partition is currently mounted read the Status field. To see what partition type you use in the Partition type field. To see the size of the partition is in the Size field. To see the available size read the Available field. To see how much is used of your partition see the Used label. To see what flags a partition has read the Flags field.
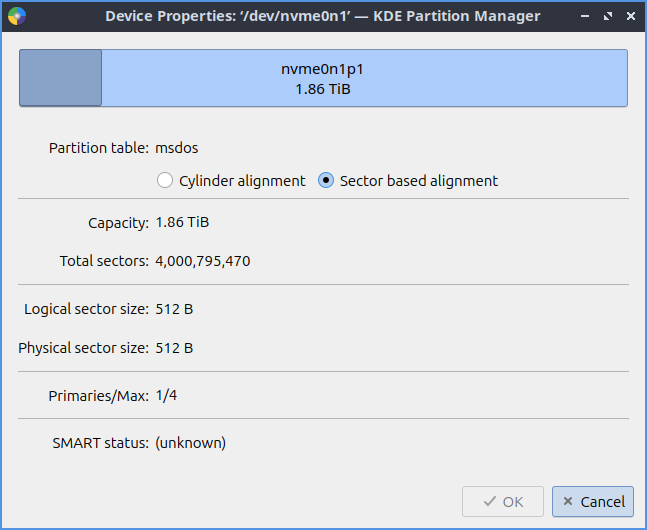
If you have multiple drives on your system . To view information on the current drive such as what type of partition table or Logical size and smart status . If you do not really see all your devices or current status press F5 or . To show which filesystems and what operations can be done with KDE Partition Manager . The checkmark means the operation is supported and the red ! shows that the function is not supported. To see what program is used for this file system operation see the Support Tools column.
If you want to quit KDE Partition Manager press Control+Q.
Screenshot

Version
Lubuntu ships with version 25.07.90 of KDE Partition Manager.
How to launch
To launch KDE Partition Manager from the or run
partitionmanager
from the command line. The icon for KDE Partition Manager is a series of blue and green rings that are partially complete with a white center.
Customizing
To toggle showing a statusbar that shows pending operations check/uncheck the checkbox in the menu. To toggle showing your devices side pane check/uncheck the . To toggle showing information about the currently selected partition check/uncheck the checkbox in the menu. To toggle showing pending operations check/uncheck the Settings –> Panel Shown –> Pending Operations checkbox. To toggle showing log output of check/uncheck the checkbox. To close a panel press the x button on that panel.
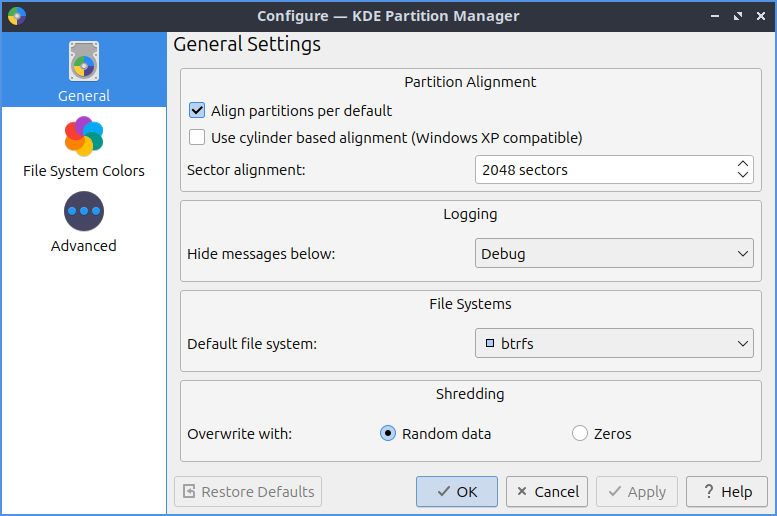
To customize settings for KDE Partition Manager press Control+Shift+, or . The General tab has settings for aligning partitions and defaults for partitions. To toggle aligning partitions with sectors on a disk check/uncheck the Align partitions by default checkbox. To change where your sectors on your disc align to use the Sector alignment field. To change which messages to log you can change with Hide messages below to hide lower level messages to be logged. To choose your default file system use the Default file system drop down menu. To change whether to overwrite shredded data with zeros or random data use the buttons to the right of Overwrite with group of buttons.
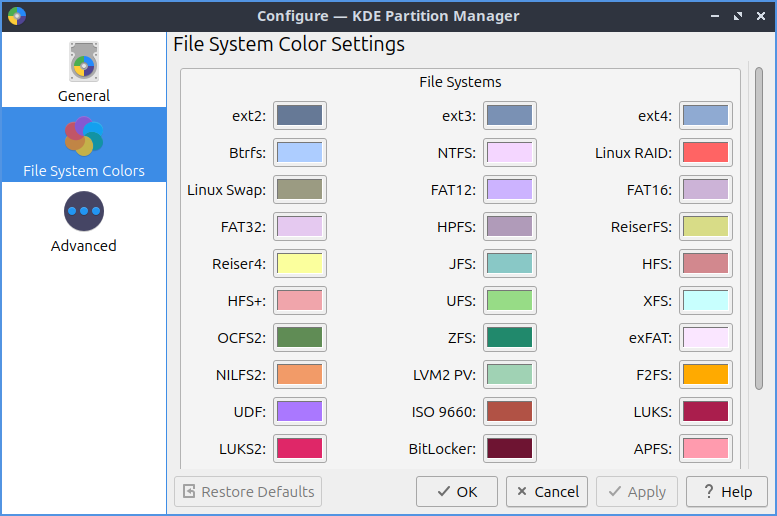
To change the different colors of filesystem as they appear use the File System Colors tab. To change the colors of each filesystem in the top bar and other things left click on the button next to the filesystem name.
The Advanced tab allows even more settings on KDE Partition Manager. To change what preferred unit to display space as by default change the Preferred unit drop down menu.